Ruby on Rails 5をvagrantで環境構築していて少し引っ掛かったのでメモ書き。
主なレシピ
- macOS 10.15.2
- vagrant-box bento/centos-6.8
- ruby 2.6.5
- rails 5.1.7
Vagrantfileに下記を追加。
(さらに…)Ruby on Rails 5をvagrantで環境構築していて少し引っ掛かったのでメモ書き。
主なレシピ
Vagrantfileに下記を追加。
(さらに…)先日、macOSをHigh Sierraにアップデートしてそれに合わせてWordPressのテスト環境(VCCW)を作り直しました。
ざっとですが、メモ書き。
VirtualBox-5.1.30
Download VirtualBox
2017年10月19日時点で VirtualBox-5.2.0 がリリースされていますが、vagrant-2.0 は VirtualBox-5.2 には未対応なので、5.1系にしておきます。
ちなみに VirtualBox-5.2 をインストールした状態で vagrant up とすると、下記のエラーメッセージが表示されて起動できません。
The provider ‘virtualbox’ that was requested to back the machine ‘vccw.test’ is reporting that it isn’t usable on this system. Thereason is shown below:
Vagrant has detected that you have a version of VirtualBox installed
that is not supported by this version of Vagrant. Please install one of the supported versions listed below to use Vagrant:4.0, 4.1, 4.2, 4.3, 5.0, 5.1
A Vagrant update may also be available that adds support for the version you specified. Please check www.vagrantup.com/downloads.html to download the latest version.
$ vagrant --version

Vagrant 2.0.0
VCCWはこちら。
現時点で vccw-3.9.0.zip がダウンロードできます。
zipファイルを展開して適当な場所に移動。
vagrant up してブラウザで、
http://vccw.test/
を開いて WordPress が利用できることを確認します。

次にテスト環境(PHPUnit)の確認。
何らかのプラグインを開発する前提です。
こちらの記事を参考にさせていただきました。m(__)m
WP-CLI+PHPUnitを使ったWordPressプラグインのユニットテスト(2)
$ vagrant ssh

$ cd /var/www/

$ wp scaffold plugin myplugin

$ cd /var/www/html/wp-content/plugins/myplugin

$ bash bin/install-wp-tests.sh wordpress_test root 'wordpress' localhost latest
これで PHPUnit のテスト環境が整うので、
$ phpunit

...

OK (1 test, 1 assertion)
となればOK。
次に、ローカル環境でWordPressのユーザアカウントを登録する場合などの、
メール通知が動くようにします。
利用するプラグインは、
Cimy Swift SMTP
ロリポップレンタルサーバーのメールサーバーを利用する場合の設定です。
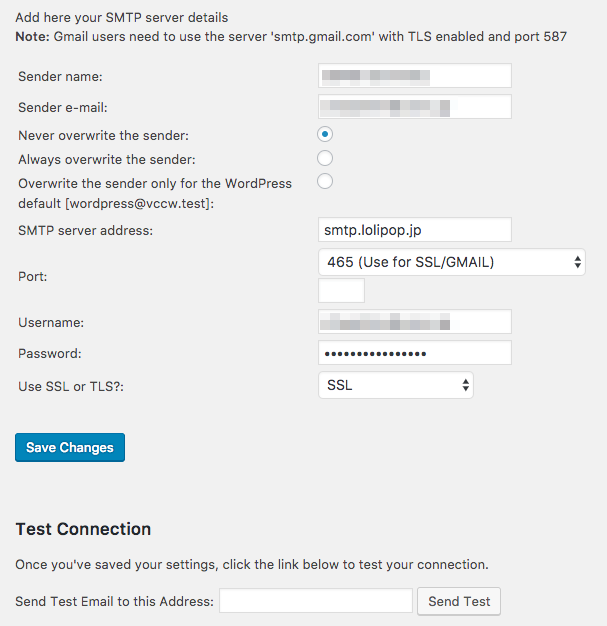
SMTP Server: smtp.lolipop
Port: 465(Use for SSL/GMAIL)
メールアカウント、パスワードは適宜入力
Use SSL or TLS?: SSL
[Save Changes]ボタンをクリックして設定を保存。
Test Connectionで自分のメールアドレスにメールが届くことを確認します。
vagrant 自体をアップデート(1.8.6 -> 1.9.1)して、vagrant up したらエラーになったのでメモ書き。
基本的には、vagrantの新しいバージョンをダウンロードして上書きでインストールすれば良さそう。
https://www.vagrantup.com/docs/installation/upgrading.html
で、アップデートして起動した際のエラーメッセージ。
Vagrant failed to initialize at a very early stage:
The plugins failed to initialize correctly. This may be due to manual modifications made within the Vagrant home directory. Vagrant can attempt to automatically correct this issue by running:
vagrant plugin repair
If Vagrant was recently updated, this error may be due to incompatible versions of dependencies. To fix this problem please remove and re-install all plugins. Vagrant can attempt to do this automatically by running:
vagrant plugin expunge –reinstall
Error message given during initialization: Unable to resolve dependency: user requested ‘vagrant-vbguest (> 0)’
ということで、メッセージに従って、
vagrant plugin repair
を実行すると、
Repairing currently installed plugins. This may take a few minutes…
Fetching: micromachine-2.0.0.gem (100%)
Fetching: vagrant-hostsupdater-1.0.2.gem (100%)
Fetching: vagrant-vbguest-0.13.0.gem (100%)
Installed plugins successfully repaired!
修復できた模様。
vagrant up でゲストOSが起動できました。
仮想環境を整えるために VirtualBox を起動したところ、バージョンアップがリリースされているようなメッセージがあったので、早速ダウンロードしてインストール。
すると、vagrant upでエラーが発生して起動できず。
シェルの画面には次のようなメッセージ。
The guest machine entered an invalid state while waiting for it to boot. Valid states are ‘starting, running’. The machine is in the ‘poweroff’ state. Please verify everything is configured properly and try again.
これだけでは様子がわからないのでGUI(VirtualBoxマネージャ)から起動してみると、
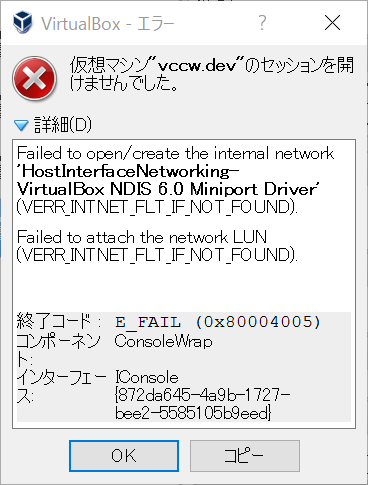
このようなエラーメッセージが表示されました。
このエラーメッセージを元にGoogleで検索して見つかった記事。
Failed to open/create the internal network Vagrant on Windows10
こちらを参考に、
[設定]->[ネットワークとインターネット]->[アダプターのオプションを変更する]
を開いて、VirtualBox NDIS 6.0 Miniport Driver のプロパティを確認。
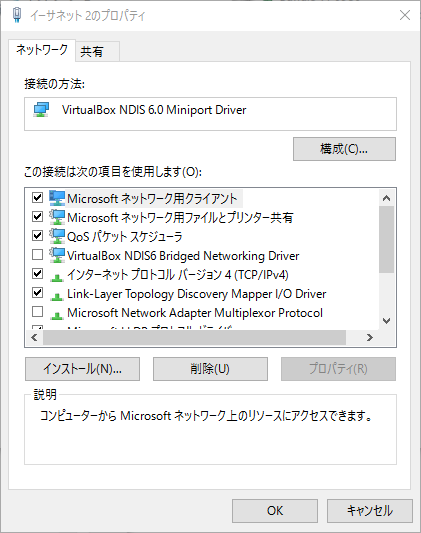
VirtualBoxをアップデートすると、
VirtualBox NDIS6 Bridged Networking Driver
このチェックが外れるようです。
チェックをいれてOKで閉じて、一度、ドライバを無効にしてから有効にすると復旧できました。